Wednesday, January 30, 2013

DIY Bedazzled Bib Necklace


So what does one do with all their left over gems used to make the infinity gauntlet?  Make a bedazzled bib necklace, of course.  I found the original pin on I Spy DIY but didn't have any nail polish handy or any Stick It Craft felt so I went to Pintrest and found something that was just as dazzling but with items I already had on hand and I found this one which is pretty simple and quick to do.

Pin Rating: 5
Duration: 30-45 minutes

Materials:
  • Acrylic gems
  • Black ribbon
  • Felt
  • Hot Glue & Hot glue gun
Optional
  • Tissue/napkin template of bib
  • Needle & thread 
I have crazy glue in the picture but didn't use it.


The picture does no justice for the colors of these beads.

Monday, January 28, 2013

Me Time


A different photo than what you would normally see but I thought you would enjoy a picture with today's blog post, even if the picture has nothing to do with what I normally blog about.  It's from a hike I did yesterday and I just love waterfalls, don't you?  :)

So I've been going back and forth on this for a about a week now and I've decided to cut down on my blog posts.  At some points in January I didn't even make my usual 3 times a week post (MWF) so instead of stressing about it I've decided it would be best to just cut back on blog post in general.  My blog was started as a way to keep myself busy during unemployment and to try and develop new skills and spend more time with my hobbies.  It's been almost 5 months since I've been unemployed and I still have had no luck finding a job.  I've been applying to jobs once a week but haven't had any luck landing anything yet.  So I figured it's about time to cut back on my time and dedication to the blog and focus a little bit more on "me time".  I'll continue posting at least once a week since I still like to keep up my hobbies and have fun doing it so keep an eye out for that.

Wish me luck & thanks for your support so far.

Friday, January 25, 2013

Lasagna Bites


Pin Rating: 4

I've seen a lot of different bites recipes on Pintrest and have pinned a couple of them.  I've finally had a chance to make the lasagna bites so I was very excited for this one.  I actually read up on a few different lasagna bites recipes and in the end got pinspiration from 2 of them (Here and here).  One thing you have to know about me is that I am a huge lover of lasagna.  Every italian restaurant I dine at I must try their lasagna.  (So far I think the lasagna at Macaroni Grill is the best because they use a thin pasta for the lasagna noodles.  If you guys know somewhere even better I must know!)  But because I'm such a huge lasagna fan, when I actually bit into the bites I was disappointed.  The extra crispiness from the wonton wrapper was nice, but I felt like it lost it's lasagna identity.  I debated between a 3.5 or 4 but in the end gave it a 4 because it did taste good, it just didn't live up to my high lasagna expectations.   


Ingredients:
  • Mini muffin tins (silicone ones work best)
  • Wonton Wrapper Sheets  (I was lucky enough to live close to an asian supermarket, but in case you don't, you can find them on Amazon.)
  • 1 1/2 cup Ricota cheese
  • Cooking spray (optional)
  • Meat sauce
    • I used 1 lb of ground turkey
    • 1 24oz jar of sauce
    • 1/2 small onion chopped
    • Salt & pepper to taste
  • 2 cups of Mozzerella (I was generous with the cheese :))
Preheat oven to 375° F.
Regular sized muffins: 18-20 minutes
Mini muffins: 10-12 minutes

I made my own adjustments to the recipe in terms of the size I used for the bites but other than that I followed the recicpe and layering instructions.  I also tested out the original size in the full muffin tin as well as made the mini muffin sized lasagna bites.  I ended up liking the smaller bites better.  

Wednesday, January 23, 2013

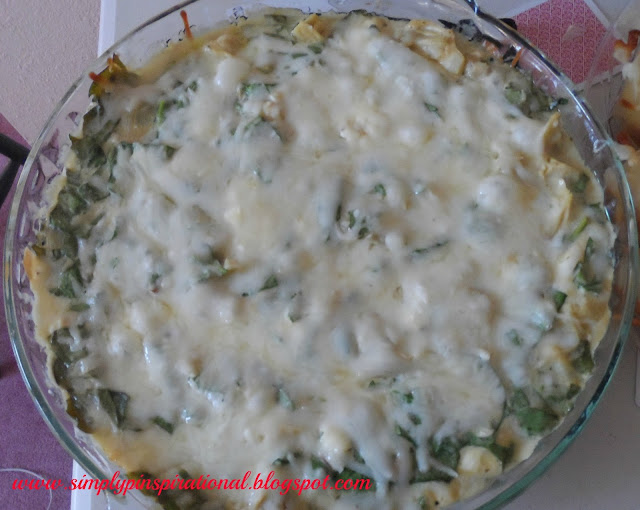
Copy Cat Applebee's Spinach Artichoke Dip

Copy Cat Applebee's Spinach Artichoke Dip

I ran across an awesome blog on Pintrest in search of this artichoke dip - The Budget Savvy Diva.  Her website is filled with tons of budget friendly recipes and deals.  Definitely check it out if you have the chance.  I did make minor changes to the amounts in the ingredients but the items are still all the same.

Also, before I dive into the blog post I wanted to give a quick shout out to the members of http://bloggingitforward.com/ for helping me make some changes to my blog.  So you'll probably see some changes to the website in the near future, and it will all be for a better blogging experience for you and me.  :)


Pin Rating: 4.5

This recipe was easy to make and tasted great.  However, I think there is probably a more delicious spinach dip out there.  Even though this dip was served fresh, it didn't seem as too many people were eating it.  My friends seemed to have gravitated towards other dishes that was served.  I also realized I didn't take too many pictures because it was my last dish that needed to go into the oven and the guest were already arriving.

Ingredients:
  • 10oz bag of fresh spinach
  • 14oz artichoke hearts drained & chopped
  • 1 cup shredded parmesan cheese
  • 1 cup shredded mozzarella cheese
  • 8-10oz alfredo sauce
  • 1 teaspoon minced garlic
  • 4 oz softened cream cheese
  • 1 tsp pepper
  • Chips or bread for dipping ;)
Oven 350 degrees.  Bake time 30 minutes.

Monday, January 21, 2013

Game Night - Dice Cheese Blocks


The dice cheese blocks were pinspired by this pin here.  Unfortunately the pin link itself leads you to a blog round up which leads you to a dead source.  On the other hand, the pin image itself gives you the right idea just not the materials.  So here's my blog post on what I used an how I made it.


Pin Rating: 5

Ingredients:
  • Frozen Grapes (I had grapes left over from the PB+Chicken salad wraps 
    • Frozen grapes are easier to cut in my opinion and it also holds it's shape well.  You can also use olives but since I had left over grapes I used those instead.
  • Cheese block (Or some sort of soft cheese that you can mold)
  • Toothpicks 
  • Crackers
  • Dice (for a sample on where to place grapes if you care for accuracy)

Friday, January 18, 2013

More DIY Game Night Decor

At the beginning of the month I posted about a Game Day food table & decor and now I'm finally getting around to posting more details about the prep.  This blog post is going to be a few Fast & Simple projects put together.


Playing card box, Vase Decor & Card Cover for a Dip


What you'll need:
  • Playing cards (2 decks for $1 @ Dollar Tree)  I am still using the same deck I used for the card banner.
  • Cardboard box to height of your liking.  I just used an amazon cardboard box I had laying around.
  • 2 short vases (Dollar Tree purchase)
  • 1 pack of dice (Dollar Tree purchase)
  • Hot glue & hot glue gun
  • Tape

Wednesday, January 16, 2013

PB+Chicken Salad Lettuce Wraps


Pin Rating: 5

I feel like it's been a while since I had a pin rating post so I'm starting this off with a 5 pin rating post.  I originally pinned this recipe for PB+Chicken Salad Lettuce Wraps because it seemed like a nice quick, easy and delicious recipe to try, and it was!  I'm sure I could have made this dish in one swoop, but since I was taking on so many different dishes the next morning before the party I liked this one because I was able chop and prep it and then refrigerate it.  The recipe card makes 1 serving but I multiplied it for the party so see my adjustments below.

Serves 3
Ingredients :
  • 1 1/2 cup chopped cooked chicken breast
  • 1/2 green apple
  • 1 bunch of grapes or 1/3 cup
  • 1/3 cup peanut butter 
  • 3 tablespoon mayonnaise
  • 1/3 cup honey
  • Iceberg lettuce

Monday, January 14, 2013

Infinity Gauntlet - Assembly & Completion


Alright, so after you have the LEDs wired up and ready to go you're ready for the next steps.  I don't have many pictures of this because I did it all in less than 24 hours to make sure I had it ready and wrapped in time for Christmas, but I'll try to walk you guys through the steps the best I can.

Now that you have your rivetspaper prototype, and LEDs ready to go the next step is to actually assemble the gauntlet using your metal....right?  Nope!  I did it with poster board and ArtEmboss Aluminum!  I don't have any pictures of a few of my products/materials I used for this process so I'm going to link them up here below.


*Note*: For the Acrylic Gems I ended up buying 2 bags in store.  As the description in the link says, the bag includes assorted colors so you don't know what you'll end up with.  Purple was very hard to find so I sat there in the store trying to flip the gems around in the bag until I could get a clear view of what color they were.  I ended up buying 2 bags because 1 had purple and 1 had red.  

Also, since there is no yellow gem in that pack, I used a yellow fabric for the back of the white gem and a yellow highlighter....It'll be our little secret, okay?  I think yellow nail polish could have worked too.  The backside of the gems are silver metallic which I sanded off with sand paper.  I probably didn't need to do that since the LEDs are so bright they could have shown right through it, but I like how it turned out.

Thursday, January 10, 2013

Infinity Gauntlet - LED wiring


I'm sure this is the moment you've all been waiting for!  LED wiring for the Infinity Gauntlet.  First off I want to give a big thanks to my friend Ron for helping me clean up the LEDs.  And also for teaching me about lemons!  I'll get more to that later.  Before I start with the step by step tutorial, I have to let everyone know that going into this project I had no knowledge LEDs, resistors, wiring, etc except what I have learned and forgotten from high school and college.  So even if you have no knowledge of wiring up LEDs, I'm hoping that with this tutorial, safety, and a little bit of practice, you too can have LEDs to light up your infinity gauntlet.


What you'll need (not all items pictured):
  • Soldering Tool Kit (Should have Iron, soldering wire at minimum)
  • 6 white LEDs (Radio Shack #276-0320)
  • 6 resistors (160-Ohm 1/4 Watt Carbon Film Resistors)  They come in a 5 pack...
  • 1 AAA qty4 holder with on/off switch included
  • Lemon juice aka Citric Acid Flux
  • Wire cutters
  • Hookup Wires (Red - Positive & Black - Negative)

Optional
I basically walked into Radio Shack and told them what I was trying to do and how many LEDs I needed.  The associate was really helpful and at the same time not.  He was able to put my request into his little wizard and it popped out the necessary items I need, and the circuit it should be in, but beyond that he wasn't much help.

Here are the Youtube videos that I believe will be helpful for you:
Series and Parallel Circuits (I didn't watch this until I messed up the circuit so make sure you watch this first!)
LED Tutorial - Part 1
How and WHY to Solder Correctly

Monday, January 7, 2013

DIY Playing Cards Banner & Purple Cow Cutter Review

No decorated food table would be complete without a banner.  Or so that seems to be the trend now a days.  After looking around for some pinspiration I found a pin that had a few cool ideas.  I decided to also make a banner with playing cards but to make my own little twist.  I just got a Purple Cows paper cutter for Christmas so I was really excited to try it out.  My friend bought it to use for her wedding projects and I fell in love with it when I saw it.  I don't actually scrapbook or have any major use for the cutter so I never thought to get one for myself.  While Christmas shopping at Costco I saw the same product there for around $27 and stood there oooing and ahhing over it but didn't but it.  My boyfriend went back later without me and bought it for me.  ^_^  So here's a tutorial along with my own review of the product (I'm not in any way sponsored by Purple Cow).


One of the reasons I fell in love with this is because of the interchangeable blades/blade designs it comes with.  The Rotary Trimmer section snaps onto the Guillotine blade side to create one big piece which is what I preferred for storage to keep it all together.  But since the Rotary Trimmer also comes with a straight blade it's like buying 2 straight cutters in 1!

Friday, January 4, 2013

Game Night Food Table!

Today's been a long and productive day so I'm going to make today's post really short.  I spent an hour or so with my friend today clearing our Hobby Lobby's Christmas decorations (80% off) for her wedding decor in December 2013.  Congrats again on your engagement!

So back to the blog post, as I mentioned in a previous post, my boyfriend decided to have a small get together at his house on New Year's Day to play some board games.  So it's not really game night, but more like board game day. He originally wanted it to be a small get together but I decided to use the opportunity to put together some decorations and make some pinspired finger foods. In the end we had a a large group of friend over and the decorations and foods were a hit.  Here's a preview for what's to come in blog posts (no listed in any particular order).


I also made Deviled Eggs, Honey Sauced Chicken, Skyline Chili Dip and my sister (thanks again sis!) made HotLink Corndog minis, Pigs in a Blanket, and some Spicy Cream Cheese Poppers.  And only 2 people made all of this food, can you believe it?!  Granted it took me a couple of hours the day before to prep a lot of the food, but being able to see this final display made me really happy.  And not to mention provided full tummies to our guest as well!  Individual posts to come shortly.

Wednesday, January 2, 2013

Infinity Gauntlet - Paper prototype

Hi Everyone!  How has your new year been so far?  Here's my first post for 2013!  I can feel that it's going to be quite the exciting year. Especially since I just made another Etsy sale!!  *happy dance*  Okay, enough diddle daddling and to the point now.  Time for the infinity gauntlet prototype post.


  • Left Yellow glove (since the template is for the left or flip template for right hand)
  • A print of David Guyton's Gauntlet template
  • Thumb tacks (from the Dollar Tree)
  • Tape
  • Pliers optional
So my boyfriend loves comic books and has always told me about the Infinity Gauntlet and how he wants one.  Every time we walk around a craft store or random shop and he sees gems he would pick them up and wonder if they can be incorporated into a gauntlet some how.  So one day after Halloween I was Googleing and You Tubing other random projects such as resin masks and props and one video caught my eye.

"How to Make a Gauntlet Armor Tutorial" by David J. Guyton


The gold gauntlet caught my eye and not to mention it's a tutorial!  I clicked on the video and watched it and was throughly impressed.  What made this video more amazing was that he was selling the template for $5.  I was a little worried at first since the video was posted in 2010 and didn't know if I would get the template or even a response if I paid for the template, but I noticed that David is really quick in providing youtube responses so I gave it a go.  After I paid for the template he responded with the gauntlet template within in 24 hours!  Also, he just posted a new video today for gauntlet version 2 so you'll have some options for your design!  The video above suggest that you make a paper prototype first so that's exactly what I did.