

Alright, so we're right where we left off after Part 1 of the making of the R2D2 Plushie. You have the 3 blue pieces sewn into the top head and other parts are pinned in place ready to sew. I took a lot more pictures during this process since I found some parts hard to understand or explain so hopefully the amount of pictures will help. I probably should have split it into 3 parts, but you'll just have to bear with me and the really looooong part 2 post. So here goes part 2!

The next step will be to sew close the bottom part of the circle onto the head piece. This means only the circumference of the top circle will be sewn down. The slit down the middle of the head will be open. Stuff the head so it's at 80% capacity to help you keep it's shape while you sew it close.

You will eventually close the whole top circle securely onto the head panels.

For the stitch to close the final circle use the open hole that you have left to help yourself maneuver around to knot the threads closed.

Once you've completely sewn on the head, stuff the head to 98% capacity. (100% might overstuff it and cause the bottom to bulge out which is not ideal)

Close the opening by pinching it together. Note, I did not grab both ends of the hole together. You want to first create a small fold in the seam on each side and then fold those together to make it seem as if you sewed it from the inside. Pin this. If you can't get it perfect don't worry about it because it will be covered by the top blue circle and your last blue panel.

With a pin holding the opening together, start your thread through the very top of R2D2's head.

Close up on the top of the head. Try to make sure not to have such a pointy head if you can help it. The top will be covered by the blue circle, but you still want to create the illusion that his head is round on top, not pointy.

After sewing a couple of stitches at the top to hold it down, add in your blue circle top. Here's where the multiple needles comes in handy. I left my grey thread needle hanging (literally) and switched over to my 2nd needle with the blue thread to stitch on the top. If you look closely at the photo you will notice the two different thread colors. Finish sewing on your top. You will need to sew using without poking the needle through all the way into the bottom since you won't be able to retrieve the needle. Keep to the surface only. It can be a little frustrating but it's doable. I managed to poke myself a couple of times in the process....There's a photo about 4 photos down where you can see what I'm talking about for the top stitching needle.

Finish the blue circle and then go back to sewing the head flap closed.

Next sew on the last "scope" button onto the blue head piece. I used a white thread to create an illusion of light. Silly right? :) So when you're ready, running your blue thread needle through the bottom of this piece also helps hides the knots from plain view.

With the blue threaded needle, sneak the needle up and under the your button towards the top of the piece. This now gives you free reign to "top sew" the last blue piece onto the head with the illusion that you sewed it from the inside since the knot is not visible. Use a couple of pins to hold the blue piece in place while you sew.
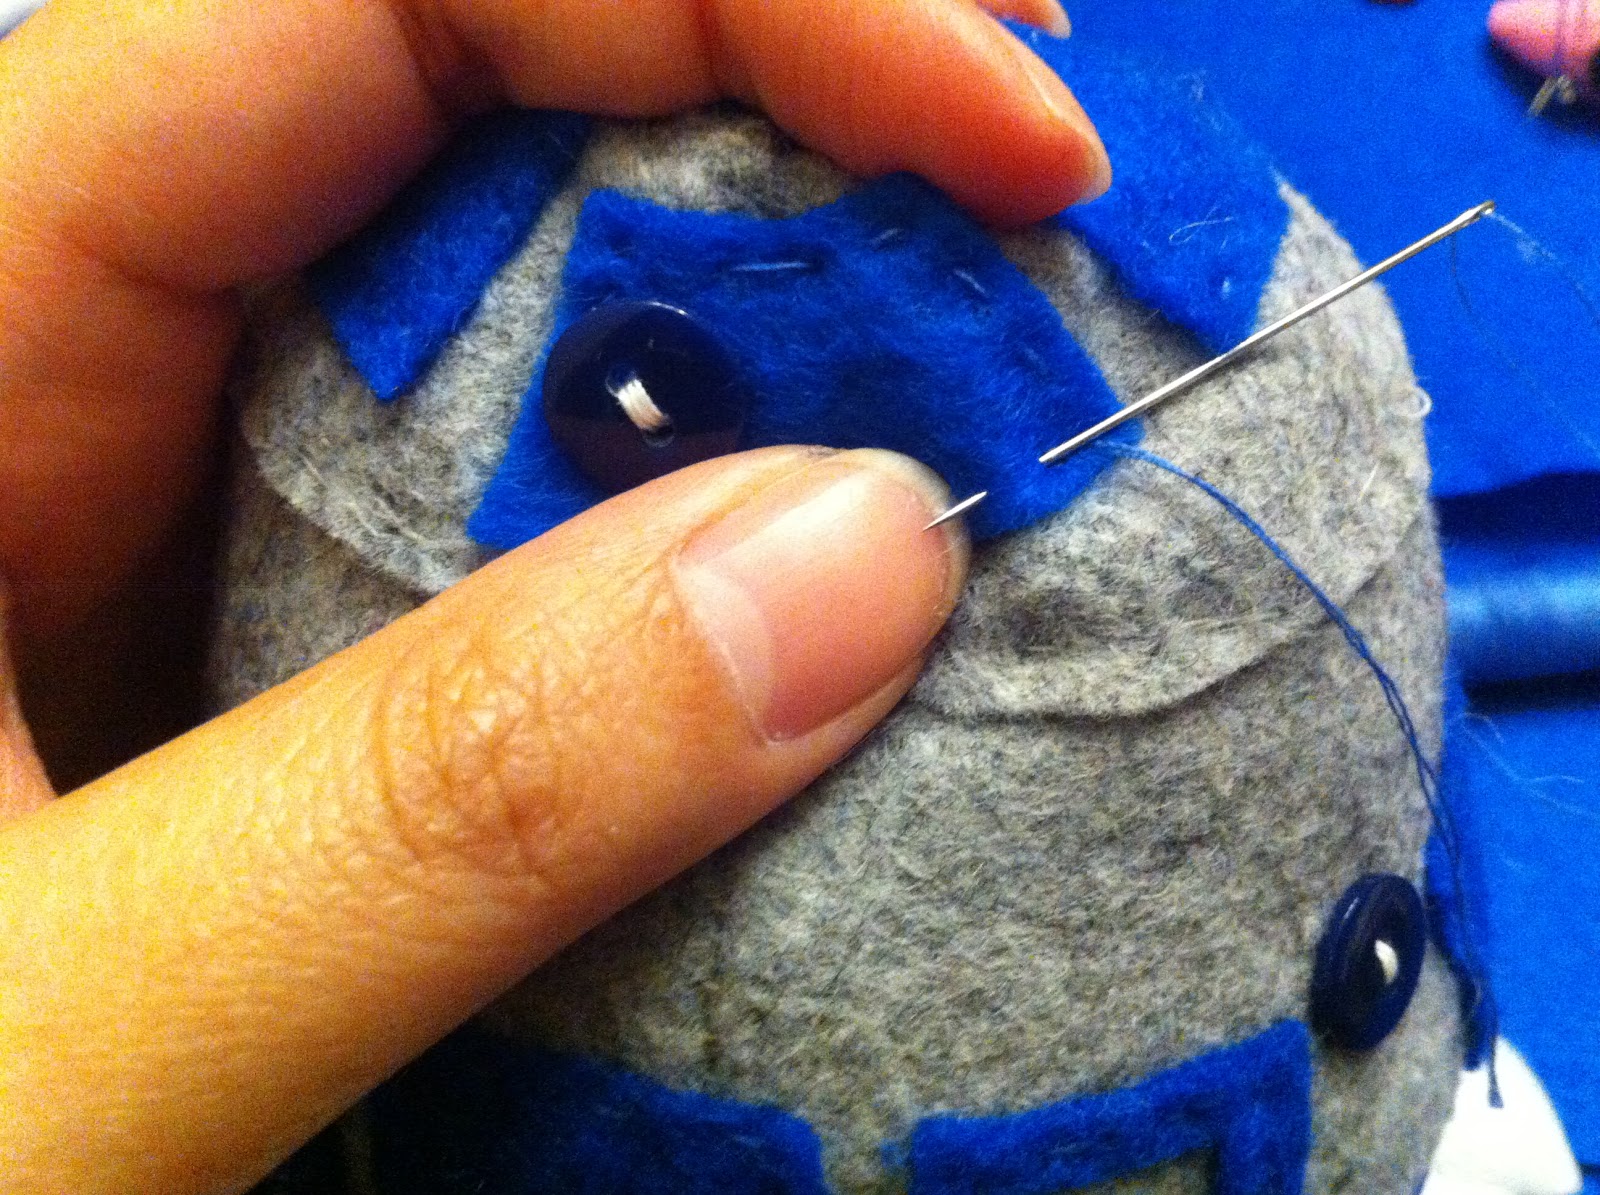
This is what I mean by top sew. You stick your needle in and pinch and push the needle back out on top without having to pull the needle all the way down and back up. It's pretty annoying, it also forces you to have bigger visible stitching, and expect to get stabbed a couple of times....but it's all well worth it! When you're done sewing all around the blue piece, finish your knot off under the button to hide the knot.

Here's the finished head piece!


Now time for the leg pieces. Cut your leg pieces out so that they stand taller than the actual body. You want your body to come off the ground. I unfortunately didn't remember to take pictures during the leg building process but I'll try my best to explain how I did it.
- Cut out 4 total white leg pieces. Sew the 2 white pieces together and but not connecting the bottom flats of the feet. Flip them inside out and you should have an arm.
- Cut out the blue rectangles that will go onto t he arm and sew it on the outside of your arms.
- Then cut out the grey circles and sew that onto your arms.
- Note, you can sew on the blue and grey pieces to the arms first, but you have to make sure you place them face down when you're sewing the white piece together so that when you flip them inside out it will be right side out. I didn't feel like thinking about it too much so I just sewed them on after I had the white parts sewn together already.
- Sew the inside of the white leg to the body. Make sure they're even on both sides.
- Sew 2 points on each leg to secure them to the body - Top & near the bottom of the body.

Stuff the body about 80% uncompressed so give you a shape to work with.

Take the cable cord and knot it at one end. Measure out the length you desire and then cut and knot the other end. Sew through the knot and the cords close to it onto the foot. Do this twice for each foot.

For the bottom of the foot I actually just stuffed it full and stood the foot over some white felt and traced and outline of the foot and used it as my template for the foot bottom. You can see my pen markings on the foot bottom that I used. So I approached the foot technique with some of the same techniques I used for the head. Start by sewing it with both right sides (the sides you want to eventually have exposed) face to face. Start stitching the pieces together starting at the middle of the back of the foot.

When you can no longer comfortably stitch the foot, switch to the technique used on the head flap. Close the foot and you'll notice how the edges come together. You will want to continue sewing the inside flaps. This time it should be a little bit easier to stitch from the insides because you can actually see what you're doing to it. Use one finger to push the two edges together and then pull your needle through the two felt pieces on the inside. Just keep in mind that you always wants the two "right" parts facing each other.

Eventually your foot should look like this. When you have a tiny hole left, stop sewing. You don't necessarily have to knot it off but you can if you're running short on thread.

You will want to cut out a small card board piece for the bottom of the feet. I put this in the bottom of the foot in hopes that it will help stabilize the plushie and allow it to stand on it's own.

Make sure the size fits, not too big and not too small. Slip it into the opening. Then stuff your foot to 100% capacity compressed. Keep in mind the legs will be holding your whole figure so you want it sturdy. I stuffed both legs (even though the other leg wasn't sewn yet) to test it at this point to make sure it will stay standing. Once your'e satisfied that it'll stand then you can proceed to close the foot.

Finish the foot with the stitching on the outside. I didn't know how else to close it and avoid it looking like an outside stitch so I made sire to have the stitch end in the back of the foot to hide as much of it as possible. Repeat this process for the 2nd foot.

Stuff and close the body using the same technique used for the foot. Start at the back middle of the body. I caved the top of the body a little bit so that the head can sit comfortably in it. Since the legs are holding the body up, feel free to fill up the body to only a 90% capacity so that your head can sit flat.
And then your'e DONE!~ Whew! If you made it to the bottom of this post give yourself a pat on the back. Now go try to make your own plushie!
No comments:
Post a Comment