
http://pinterest.com/pin/231724343298182755/
Photo credit: The Beauty Department
Pin Rating: 4.5
Duration: ~15-20 min
Sorry I've been MIA for a week now but I've had quite an exciting weekend. I've been busy working away on some Halloween Costume for Mickey's Halloween Party at Disneyland. In August one of the blogs I follow (Budget Fairy Tale) had a blogiversary giveaway and I was lucky enough to win the free photo shoot with Jenna at White Rabbit Photo Boutique!!! So I decided it would be a great idea to have the photo shoot in costume at Disneyland! A couple of friends and my boyfriend and I attended the photo shoot as Haunted Mansion Ballroom dancers. This hairstyle that I found on Pintrest was the perfect solution to a quick and elegant up-do that the girls can do for the photo shoot.
The pintrest photo does a great job of breaking down the instructions. I don't have any pictures of the step by steps I did, but I have to admit, it's a little hard to do this one by yourself so I gave it a 4.5 rating. Also if you have layered hair (which I do) it gets a little bit harder to manage as well. Luckily I had my friend there to help me so we did each other's hair for the night.
.JPG)
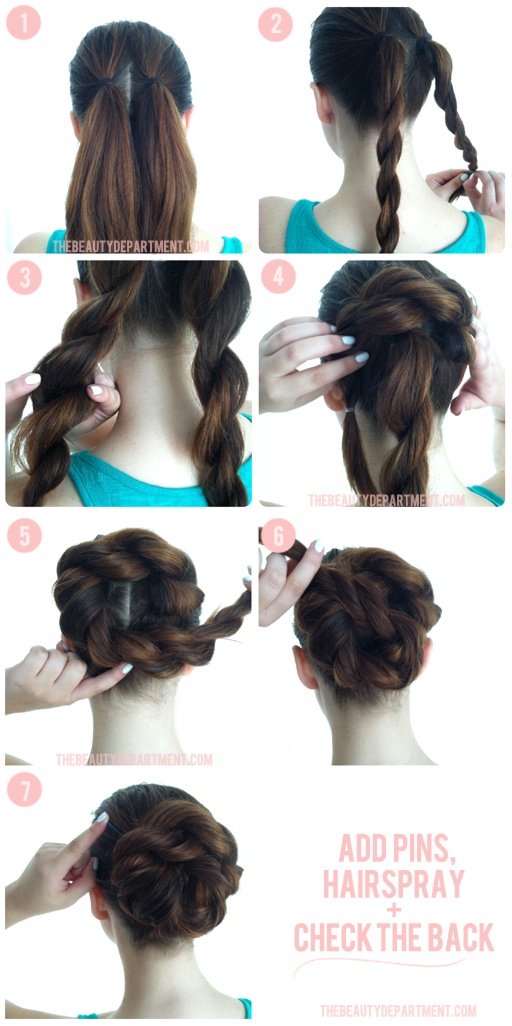
What you'll need:
- Hairspray
- 2 thin hair ties
- 2 small elastic hair ties - black or clear depending on hair color ( I like using Goody's ouchless elastic bands) Note: These small ones should be as big as the width of your fingers. It will make it easier to tie the ends of your hair.
- Standard sized Bobby pins (if you happen to have larger bobby pins like I was lucky enough to, use them! They help out a lot)
- Brush
Step 1: Tie your hair up into two high ponytails as close to the middle line of your hair as possible.
Step 2: Do a rope braid with the ponytails. If you have layers this is where it gets a little tricky. Wet your hands and run it down your ponytail. It will also help if you spray some hair spray into your hands and run that through your braid as you are braiding the layers. This will keep the layers from fraying out too much. Then tie the ends with the small elastic hair ties.
Step 3: Flatten and pull out the ropes of your braid to give it a fuller look and hair spray it for a longer lasting finished look.
Step 4: Wrap the braid on the right over the top of the ponytail on the left. Pin it if you have to. Make sure to go as high as possible and cover up the hair split in the middle of your head. For the end of the braid tuck it under the left braid and pin it in the center of your hair.
Step 5/6: Loop the left braid around the outside of the right ponytail braid. Continue looping it around and pinning the outside down as you go around in a circle. You will eventually have to loop the ends in the center like a swirl but make sure to tuck the ends in so that it's not visible. This is probably the trickiest part.
Step 7: Check your back. Pin any loose ends and comb up any baby hairs on the bottom and hair spray them into place. In fact, hair spray everything to it stays. And then you're done!
.JPG)
This was from a quick hair trial without hair spray. It took only ~5 minutes and looked fabulous!

Note: My hair split is visible in the back as well as some bobby pins on the side. To avoid this, make sure to loop the hair around high on top of the other pony tail. Also, always remember that the bobby pins should be stuck into the bun, not away from it so that the hairstyle has an overall cleaner look to it.
Here's a preview from our photographer of the photo shoot that night!! :D
 |
| Photo Credit: White Rabbit Photo Boutique |
No comments:
Post a Comment