Showing posts with label easy. Show all posts

Wednesday, May 22, 2013

DIY Jewelry Holder


Pin Rating: 5
Difficulty: Easy
Cost: Under $10
Original Pin Here

I've been looking for a quick and cute way to display my jewelry and earrings at the craft fairs and I've finally found it!  It's super cute and quick to make and I had all the materials already laying around the house.

  • Picture frame to hang or stand on a table.  Remove the glass piece.
  • Hot glue gun/hot glue
  • Lace (the more holes in the design the better)


Wednesday, May 15, 2013

Toilet Paper Roll Art


Pin rating: 5
Cost: $0 (save your toilet paper rolls!)
Difficulty: Easy

The first time I saw toilet paper roll art on Pintrest my mind was blown away!  I knew I had to try this at some point and I finally had a chance to do it.  So I've been collecting toilet paper rolls ever since last year. (You might even remember one of my organization post with gift wrap & toilet paper rolls)  I had a nice collection until some of it was thrown away so I only had a couple of rolls for this project, but 4 rolls seemed like a perfect amount to get started.  

For this particular project, I got my design from this post here at KidsKubby.com 

  • Toilet Paper Roll (at least 4)
  • Hot glue gun/hot glue
  • Scissors or paper cutter
  • Paint of your choice (optional)
  • Push pins or nails to mount 


Monday, January 21, 2013

Game Night - Dice Cheese Blocks


The dice cheese blocks were pinspired by this pin here.  Unfortunately the pin link itself leads you to a blog round up which leads you to a dead source.  On the other hand, the pin image itself gives you the right idea just not the materials.  So here's my blog post on what I used an how I made it.


Pin Rating: 5

Ingredients:
  • Frozen Grapes (I had grapes left over from the PB+Chicken salad wraps 
    • Frozen grapes are easier to cut in my opinion and it also holds it's shape well.  You can also use olives but since I had left over grapes I used those instead.
  • Cheese block (Or some sort of soft cheese that you can mold)
  • Toothpicks 
  • Crackers
  • Dice (for a sample on where to place grapes if you care for accuracy)

Monday, December 10, 2012

DIY Washer + Ribbon Necklace


Original pin: http://pinterest.com/pin/231724343298464714/
Original blog: Nestled

Pin rating: 4.5
Difficulty: Easy

I love no sew projects and this one in particular was quite fun.  I definitely had an easier time with this one than I did with the pearl ribbon bracelets.  Also loves that this little project required me to make a trip to the hardware store.  I just get all giddy when I'm in there.  That place is so amazing and can inspire so many DIY projects for the home, or in this case jewelry.  My next blog post is also going to be a jewelry piece that includes material from the hardware store so check back on Wednesday.  

So I struggled a little at first in understanding the instructions because it mentions to thread ribbon up or down through the washers but since it has the pictures it made it a lot easier to understand.  I'm going to use the instructions from the Nestled blog and try to clarify anything I thought was confusing.  It was mostly  step 1 where I got confused but everything else was straight forward.


  • 20 pieces of 7/16" flat washer (50 pack at Orchard Supply Hardware for ~$3.00)
  • 1 1/2 yard of 5/8" wide ribbon
*Update* You can now purchase your very own Washer Necklace DIY Kit via my Etsy Shop.

Friday, November 30, 2012

DIY Hot Glue Snowflake Ornament

Original Pin: http://pinterest.com/pin/231724343298567815/

Pin rating: 4.5
Duration: 20-30 minutes

Here's a nice fast and simple project for today's blog post.  And it's great for kids too!  I was watching my nephew the other day and after he finished his homework I gave him the option of reading comic books or making snowflakes.  Since he's not a huge fan of reading and just finished reading about 20 pages for homework he immediately shouted make snowflakes.  So I had him help by reading off the directions from the blog (got him to do more reading after all) and help with glittering.  So I highly recommend this project!  The only thing is that practice makes perfect so don't be disappointed if your first snowflake isn't perfect - mine totally looked rigged but it's okay every snowflake is different!


  • Snowflake print out to use as stencil
  • Glitter (The glitter shown was picked up at the Dollar Tree) 
  • Hot glue gun
  • Glue sticks (I used at least 2 for 1 snowflake)
  • Soap detergent (to create a buffer for ease of removal)
  • Wax paper
  • Martha Stewart Glittering Glue w/ Brush (Or Mod Podge and a brush)
  • String or wire
  • Paper plate (or something to sprinkle glitter all over :))

Monday, November 5, 2012

Garlicy Baked Shrimp


Pin Rating: 4.5
Duration: 5 min for prep & 25 minutes for the shrimp dish to bake(~ 20 minutes for the spaghetti - water takes forever to boil!)

My sister has been trying to clean out the freezer for a couple of weeks now since we've seemed to have stock piled the freezer full of food and haven't touched any of it yet.  We just happened to have 1 pound of shrimp and we weren't sure what to make for dinner until my sister reminded me I have a yummy looking shrimp dish pinned on one of my Pintrest boards (http://pinterest.com/pin/231724343298452022/).  The dish came out pretty good, but lacked a little flavor and it was probably due to me not adding white wine since there wasn't already a bottle at home. But other than that, delicious!


  • 1 lb. of Medium or Large Shrimp (pre-peeled and deveined will save you a lot of time!)
  • 1/4 cup softened butter (I let mine sit out to room temperature)
  • 4 cloves of garlic (It calls for sliced but I had some minced - not pictured)
  • 2 tbps white wine
  • 1/2 tsp salt
  • 1/4 tsp pepper
  • 1/4 cup panko bread crumbs
  • 2 tbsp parsley
  • Olive oil

Friday, November 2, 2012

Homemade Taco Shells & Bowls


Pin Rating: 5
Duration: 20-30 minutes (7-10 minute cook time per batch)

Mini Rant about the pin: The taco bowl pin drove me a little nuts because when I went to go look at the original instructions there were none!  This was an actual upload by a user so it didn't link up to a website and the pin itself didn't have any instructions.  I'll repin my own picture in a bit with instructions so that there's a good copy out there on Pintrest for everyone to repin.   End of rant. :)

Last month my boyfriend decided he wants to start budgeting a little better so we went grocery shopping.  Some Guerrero corn tortillas were on sale so we grabbed a pack.  Once we got home he decided to have a snack and took one bite of it and almost immediately had a frown on his face.  Apparently these are not the tortillas that he likes.  So since we bought them and we have them I turned to Pintrest for some ways to spice them up a bit so that they're more to his liking.  This quick and simple recipe did the trick!  He loved them and said they were way better this time.  (I made this over at my boyfriend's house and only had my phone so pictures aren't that great but hopefully you can get a good idea of what is going on)

Here's the original pin for the taco shells: http://pinterest.com/pin/231724343298465668/  I used the instructions from this pin to make both shapes of tortilla.

What you'll need:
  • Cooking oil (spray or have a brush handy is recommended)
  • Tortillas
  • Oven rack
  • Muffin tin
  • Oven @ 375°F


First microwave your tortillas wrapped in paper towel for at least 30 seconds.  This gets them soft and flexible so that they won't break as easily when you're handling them.  I didn't have a brush handy or a spray so I poured some olive oil onto a plate and then dipped the tortilla evenly on both sides.

Monday, October 15, 2012

Tater Tot Casserole


http://pinterest.com/pin/165296248794584047/

Pin Rating: 3.5
Prep Time: 30-45 min
Cook Time: 45 min

Helped my sister out with dinner on Friday night and changed the original recipe for this breakfast casserole with healthier ingredients and items we had in the fridge. The results of the casserole was tasty but by following the assembly instructions from the website I feel like it could have been assembled better.  I'll put in the instructions I used below and my suggestions for changes if you're planning to attempt this yourself.  I also added in chopped onions and bellpepers per my sister's request.  If you're not great with a knife in the kitchen you can forego this section and it'll cut the prep time in half.


  • Ground pork, breakfast sausage, ham or bacon  (I used ground breakfast sausage)
  • 2-4 cups shredded cheddar cheese
  • 2 cups milk
  • 4 eggs ( I used 3 eggs and 3 egg yolks since my sister had egg yolks left over from her most recent cake bake)
  • 2 lbs of frozen tater tots ( Used 1 bag of sweet potato tots)
  • 1/2 bell peper
  • 1/2 onion
  • Casserole dish


    Washed the bell pepper and chop off the top.  Next you want to take out the "pit" of the bell pepper and toss that out.  Helps if you just slice off the pieces connecting the center (shown in picture above).


    Cut the bell pepper in half.  As tempting as it may be to lay the bell pepper skin up, it's actually easier to cut it with the skin (outside) facing the cutting board.  Then cut the bell pepper into tiny slivers.  Once you cut them into slivers, continue to cut/chop them into squares.

    Wednesday, September 19, 2012

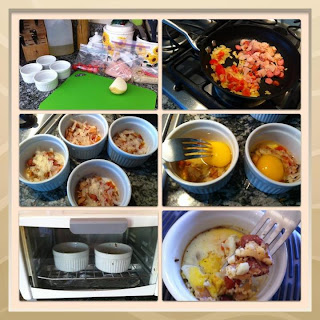
    Egg Drop - Breakfast in the oven

    Brand new to blogging so please forgive the frequent post changes and format updates. And not to mention phone quality photos I'll be sharing.  I'm recently unemployed and have a lot more free time on my hands so I was trying to figure out what to fill that idle time with (besides the job searching of course).  My interest are kind of all over the place: all things Disney, crafting/sewing/DIY, cooking, party planning, cosplaying, etc...so blogging about one thing wouldn't work out for me.

    Lucky there's Pintrest where all of my different interest are organized!  Not to mention some of the best and nifty ideas can be found on Pintrest.  I realized that there are so many pins and pinboards to flip through but how many of those things do we actually use/try in real life?  So this blog will be filled with my attempts to find some of the best and easiest pins to try out.  I'll try to rate the pins on how realistic they are to do or not based on a 1-5 pin rating (5 being the easiest and best) to help other pinners out.

    So here goes...


    Today's pinspiration came from a pin from foodgawker.com (http://www.kayotic.nl/blog/egg-drop).


    Ingredients: Onion, ham, cherry tomatoes (Thanks Kathryn ), shredded cheese, smokies

    * Chop ingredients then saute
    * Distribute evenly into oiled ramekins
    * Add some shredded cheese
    * Crack an egg and drop it into the ramekin. (I only made 2 to eat so I put the other 2 in the fridge for tomorrow.) Made sure to pop the yolk and get the egg to spread spreaded evenly.
    * Popped it in the mini toaster oven which was preheated to 350 degrees.
    * After 10-15 minutes pulled them out - added salt pepper and nom nom nom!


    Pin Rating: 4.5

    This is a super simple pin recipe that didn't take that much time to prep and put together and turned out delicious.  I didn't think it was a 5 star only because of the fact that if you're already sauteing all the ingredients why wait another 15 min and just break the eggs into the frying pan?  But it is good for if you're making breakfast for more than 2-4 people and/or want to just pop the ramekin in the oven and get something else ready or ready for work.  I also liked it because the ingredients are simple and should be a part of your household staples so you should be able to whip it up.  Also easy to make this in bulk on a sunday and don't break the egg in it and save that for another day so breakfast can really be ready in 15 minutes! 

    Downside is if you don't already own ramekins but there's a second pin where they made it with cupcake/muffin tins as an alternative to ramekins.