- Purple Cows 12-Inch Two-In-One Scrapbook Combo Trimmer
- 3-pack Circle Hole Punches
(Using the 1/8" for this project)
- String
- Deck of cards (Use an old deck with missing cards or purchase 2 for $1 at the Dollar tree)
One of the reasons I fell in love with this is because of the interchangeable blades/blade designs it comes with. The Rotary Trimmer section snaps onto the Guillotine blade side to create one big piece which is what I preferred for storage to keep it all together. But since the Rotary Trimmer also comes with a straight blade it's like buying 2 straight cutters in 1!
The click blades are super simple to interchange. The set comes with 7 different blade designs.
I decided to use the little peaks for this flag banner.
The Rotary comes with a lock and release feature. Just click on the black squares on the end for the lock, and pull the silver tabs back for the release.
I ran the Rotary Blade over the card and was a little disappointed that it wasn't a clean cut.
I ended up tearing the piece off and wasn't satisfied with the look - both the angle of the cut and the depth. Make sure you save the scraps! You can use it for some filler decor later.
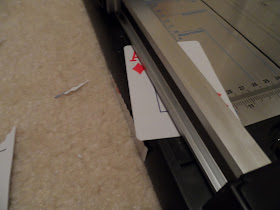
So I tested a bunch of different pressures to apply to the blade while cutting and finally found a sweet spot. The blade itself isn't on the actual edge of the cutter so you have to accommodate for that when you place your item down. In order to cut the triangles just pick one end of your card to be the bottom. Then line the "bottom" and the right hand bottom of the card on the right side of the cutter (away from the blade) as shown in the picture above.
After one clean cut take out the card and rotate it so no you're lining up the "bottom" and the left side (as shown above).
Top view
While cutting I tested out the lock bar's capability.
Nice smooth cut with applied pressure. What's interesting is that the Rotary gets best results when the track is locked down. You don't have to lock it to use it, but by locking it the track it lowers the blade closer to the paper.
The product description on Amazon states that this cutter can cut up to 10 sheets. I'm not sure if that means the Guillotine or Rotary Trimmer, but I decided to double up on playing cards for the Rotary trimmer to see how it handles.
Handled it like a beauty.
Keep cutting cards until you're satisfied with the number of flags you have. I tried to keep an even number of black and red cards as my pattern design.
Use the hole puncher to punch out 2 holes.
I made sure to keep my string loop in the back because I preferred the look. String it through the front first then loop up through he back of the next hole. Or if you prefer to string it through the front that works too, just make sure to stay constant.
I ended up using the card backs to give the banner a little more color. =)
My first impression of the paper cutter is a good one. It does what it says and it's pretty sturdy. The blades are really simple to swap out and the Rotary works with a little bit of pressure but cuts smoothly. I also tested out the Guillotine side and that had no issues as well. The only thing I need to do is figure out how to properly read all of the guidelines it has on it. But I'll just leave that as a learning process for now.


Thanks for your great information, the contents are quiet interesting.I will be waiting for your next post.
ReplyDeleteManufacturer of Playing Cards